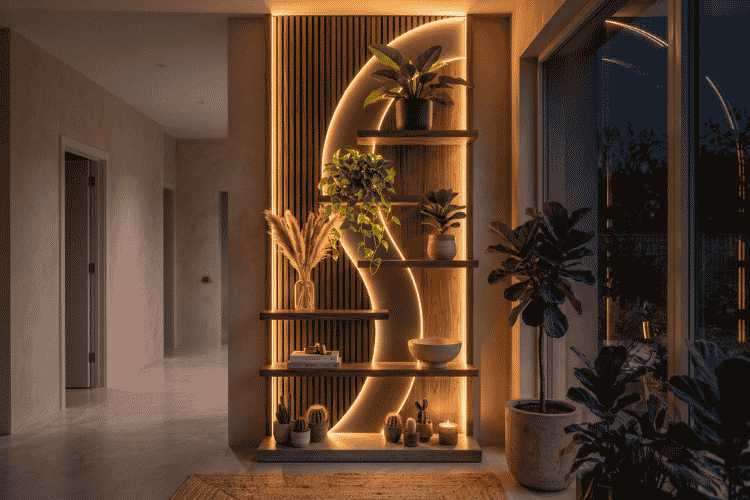
Backlit Wood Shelf DIY Idea for a Cozy Zen Entryway
Want to give a plain wall a designer-style makeover without spending a fortune on custom wall art?
This DIY backlit wood wall decor combines an oval wood panel, horizontal wood planks, a decorative wood-effect panel, and hidden LED lighting to create a warm, modern statement piece. The soft light behind the wood gives the entire installation a floating, backlit effect.
The best part? You can build the basic structure yourself and use a ready-made decorative wall panel to save time.
Disclosure: This article doesn’t contain any referral links or affiliations. You have been shown all the products as examples.
Materials You’ll Need
- 1 oval wood panel (roughly 3.5 ft tall x 2.5 ft wide, 3/4″–1″ thick plywood or MDF) — this is the centerpiece. Buy this locally rather than online; most lumber yards will do the straight cuts for you.
- 3–4 wood shelf boards, 3/4″ thick — cut these after your oval panel is finished, since each shelf length depends on where it sits on the curve.
- 1 decorative wood-slat panel (94.5″ x 12.5″ example product) for the vertical strip above and below the oval.
- 1 LED strip lighting kit (example product with app/remote control) for the backlit glow.
- L-shape shelf brackets (example product) — buy enough for 3–4 shelves, 2 brackets each.
- Wood screws (example product).
- Wood stain or finish (interior wood stain/varnish example).
- Heavy-duty wall anchors
Tools You’ll Need
- Measuring tape and pencil
- Drill/driver
- Jig Saw (if needed, you can check here)
- Nails or push pins + a length of string
- Sandpaper (120 and 220 grit)
- Stud finder
- Level
- Safety glasses
Step 1: Plan Your Wall and Mark Your Center
Use painter’s tape to outline the full size of the piece directly on your wall — this tells you right away if it’ll actually fit before you buy anything. While you’re at it, find your wall studs with a stud finder and mark them lightly in pencil. You’ll need this information later for mounting.
Plan your power source now. If you’re using a plug-in LED strip, decide where the cord will run and whether it needs to reach an outlet before you cut or mount anything. This is the single most common thing people forget, and redoing a finished wall to add an outlet or extension cord path is a real headache.
Step 2: Draw and Cut Your Oval Panel
If your local lumber yard cuts your plywood or MDF to the rough rectangle size, you’ll still need to shape the oval yourself (or ask if they can do curved cuts — some shops with a CNC or bandsaw will, for a small fee).
To draw a clean oval by hand:
- Hammer two nails into the board along its long axis, spaced apart from the center.
- Tie a loop of string around both nails, long enough that a pencil held taut against the string reaches the edges of your intended oval.
- Keeping the string taut, swing the pencil all the way around — this traces a true oval shape.
Cut along the line with a jigsaw, then sand the edges smooth, starting with 120 grit and finishing with 220 grit.
Realistic shortcut: if you don’t own a jigsaw or don’t want to freehand the curve, bring your dimensions (or a paper template) to a local hardware or cabinet shop and have them cut it. This guarantees a clean, symmetrical result and is often worth the small fee.
Step 3: Stain or Seal the Panel
Apply your wood stain or finish in thin, even coats, letting each coat dry fully (check the can — usually 4–6 hours) before adding the next.
Do this step in a ventilated space like a garage or outdoors, well before mounting day, so the panel is completely dry and odor-free by the time it goes on your wall.
Step 4: Attach and Test the LED Strip
Run the adhesive-backed LED strip around the back edge of the oval panel so the light bounces off the wall behind it, creating the glowing halo effect.
Test the lights now, before the panel is anywhere near the wall. It’s far easier to fix a dead section or a loose connector on a workbench than after everything is mounted.
Step 5: Mount the Vertical Slat Panel
Cut your decorative slat panel into two sections — one to run above your marked center point, one below — so the oval panel will sit in the gap between them.
Center both pieces on the same vertical line you marked in Step 1, and attach them with construction adhesive plus screws driven into your marked studs.
Step 6: Mount the Oval Panel
This piece, plus the shelves, brackets, and books that go on top of it, adds up to real weight — so don’t skip proper anchoring here.
- If your studs line up with the panel’s back, screw a ledger board or french cleat into the studs first, then hang the panel on that. It’s far more secure than driving screws straight through the panel face.
- If no stud lines up with your center point, use heavy-duty wall anchors rated for the combined weight of the panel, shelves, and decor.
Step 7: Install the Shelf Brackets
Looking at the reference photo, the shelves aren’t evenly spaced straight lines — they follow the curve of the oval, with the top and bottom shelves shorter and the middle shelves longer.
Mark your bracket positions at staggered heights to match this look, checking each one with a level. Drill pilot holes and screw the brackets into studs or your ledger board/backing — not just the thin panel surface — so they can actually hold weight.
Step 8: Cut and Finish the Shelf Boards
Instead of cutting all your shelf boards to one length, hold each board up against the mounted panel and mark the length that fits that specific shelf’s position. Since the oval curves, each shelf will likely be a slightly different length.
Cut, sand, and stain each board to match your panel.
Step 9: Attach the Shelves
Once your stain has fully dried, screw each shelf board down through the pre-drilled holes in its brackets.
Step 10: Style Your Shelf
This is the fun part. To recreate the look in the photo:
- Stack books both flat and upright for visual variety
- Add a textured ceramic vase with dried pampas grass on one shelf
- Let a trailing plant like pothos spill over the edge of a middle shelf
Tips for Making This Realistically
- Measure your actual wall space before ordering any panels — don’t estimate.
- Never skip the stud-finding step; drywall alone won’t support this build long-term.
- Plan your power source before you mount anything, not after.
- Dry-fit your shelves on the brackets before final attachment to double-check spacing.
- Test every electrical component before it’s on the wall, not after.
Final Thoughts
This build takes a weekend and a bit of patience with the curve, but the payoff is a genuinely custom, glowing wall feature that looks far more expensive than it is. Save this guide and tag your finished result — I’d love to see how yours turns out. Post your picture in my pin comments.
Frequently Asked Questions
Can I build this without a jigsaw or power tools?
Yes — have a local hardware or cabinet shop cut the oval panel for you using your measurements or a paper template.
How much weight can the shelves actually hold?
It depends on your bracket rating and what you’re anchoring into. Brackets screwed into studs will hold significantly more than ones anchored only into drywall — check your bracket’s listed weight rating and stay well under it once books and decor are added.
Do I need an electrician for the LED lights?
Usually not — most LED strip kits run on low-voltage power through a plug-in adapter. You’ll just need a nearby outlet, which is why planning your power source before mounting matters so much.
Can I use a circle instead of an oval, or change the size?
Absolutely — the same steps apply. Just adjust your string length in Step 2 to match the shape and size you want, and scale your shelf boards accordingly.